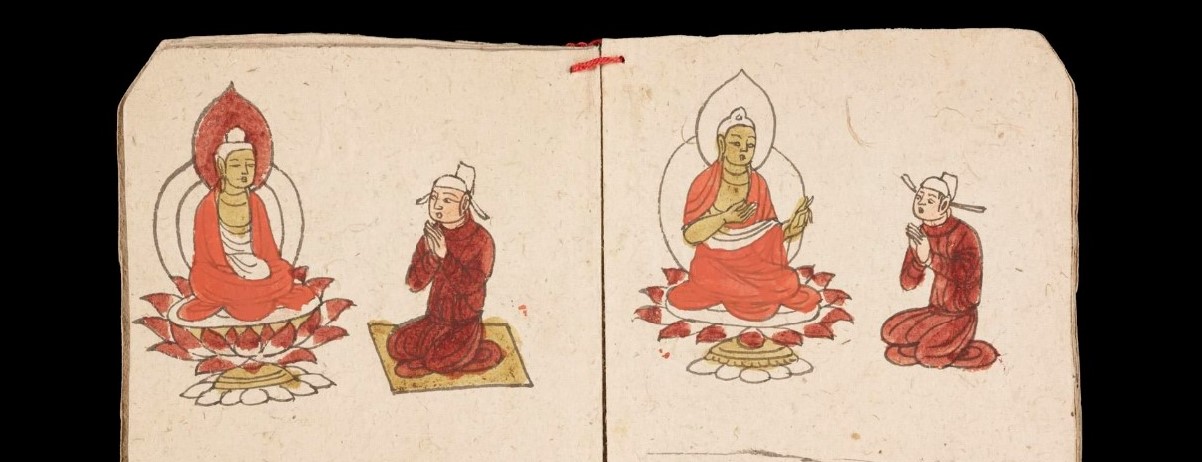
About the database
- The IDP collection database brings together objects housed in numerous partner institutions. By searching the database you will be able to see items from around the world. Click here for more information on the cooperation between partner institutions.
- Our collection database aims to provide records and images of objects from across the Silk Roads, collecting information such as dating, provenance and scholarship for objects.
- Each object has what is known as a “pressmark” to uniquely identify it. Each partner institution uses their own system to give pressmarks to objects which can suggest something about the collection history of an object. On our database the pressmark is the quickest way to locate a particular object.
- For dating, the database uses “BCE” to mean Before the Common Era and “CE” to mean Common Era.
Starting your search
- Start by searching for any term into the simple search box. You can click “Search” or press the return key for instant results.
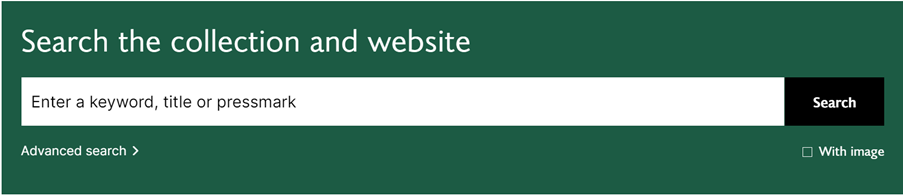
- If you want to search for a phrase or sentence, add quotation marks around it – for example “central Asian”.
- An asterisk (*) may be used to specify any number of characters. It is typically used at the end of a root word. This is helpful when you want to search for variable endings of a root word. For example, searching for excavat* would tell the database to look for all possible endings to that root. Results will include excavate, excavated, excavation or excavator.
- A question mark (?) may be used to represent a single character, anywhere in the word. It is most useful when there are variable spellings for a word, and you want to search for all variants at once. For example, searching for colo?r would return both color and colour.
- Selecting “Advanced search” will bring up advanced searching options (see below).

- Selecting “With image” will narrow the results to just those that contain images.

- After running a search, you’ll end up with a set of results which you can filter to narrow down and find what you’re looking for.
Results options
- After you’ve entered a search term or chosen a search suggestion, you’ll be taken to the results page.
- Above the detailed results are options that can give you more information on the results, as well as change the way in which they are presented on screen.

- First, you can see the number of results for the search term you have used.

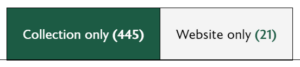
- Next, you can choose between displaying “Collection only” results, which will show only items from our collections, and “Website only”, which will show results materials published on our website such as from our blog or newsletter.
- The next two icons allow you to change between a list and grid view for displaying search results.

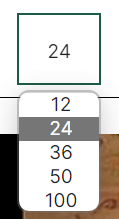
- The first dropdown menu allows you to determine how many results are displayed on each page.
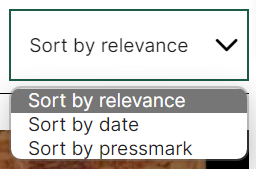
- The final dropdown menu allows you to change how the results are sorted. “Sort by relevance” will sort results by how much they match your search input. “Sort by date” will sort results chronologically. “Sort by pressmark” will sort results alphanumerically by their pressmark.
Advanced search
- The “Advanced search” options allow you to tailor your search more specifically.
- The menu for “Advanced search” appears below the simple search bar

- The first dropdown menu will give you multiple options to calibrate your search with.
• “Any field” will apply your search logic within all field of information associated with an object.
• “Pressmark” will apply your search logic to just the pressmark of an object.
• “Title” will apply your search logic to the object’s title on the database.
• “Subjects” will apply your search logic to specific topics associated with each object. For example, Buddhism or Medicine.
• “Find site” will apply your search logic to which site the object was originally found.
• “Holding Institution” will apply your search logic to which institution currently holds the object.
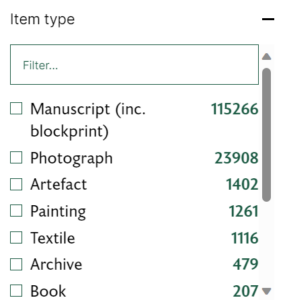
• “Item type” will apply your search logic to broad categories an object can be placed under. For example, manuscripts or photographs.
• “Item subtype” will apply your search logic more specifically to smaller categories of item. For example, scrolls or woodslips within the broader item type of manuscripts.
• “Provenance” will apply your search logic to which archaeological expedition an item is associated with. For example, Stein 1906-8 will just refer to objects associated with Marc Aurel Stein’s 1906-1908 expedition.
• “Language and script” will apply your search logic to objects which contain text based on the languages and writing scripts they use.
• “References” will apply your search logic to objects which appear in specific reference works. A list of reference materials and catalogues used by our database can be found here.

- The next dropdown menu will give options to apply certain search logic in order to filter results.
- Must contain – This search logic means that your search term must appear somewhere in any acceptable results.
- Must not contain – This search logic means that your search tern must not appear anywhere in any acceptable results.
- Must match – This search logic means that your search term must match exactly with any acceptable results.
- Matches wildcard – This search logic means that your search term can be used as a wildcard search for acceptable results.

- Click the “+” (plus) signs to the right of the fields to add in more instructions or remove them by selecting the “-” (minus) sign.

Filters
- Along the left-hand side of the results page are options to apply different filters to your results in order to find specific objects. These are similar categories as seen above with the Advanced search function.
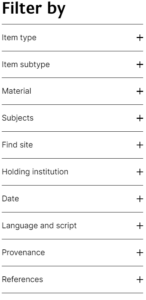
- Open each field to reveal all the options, start typing in the field at the top to filter down the list. You can then select which options to apply to your filter using the tick boxes.
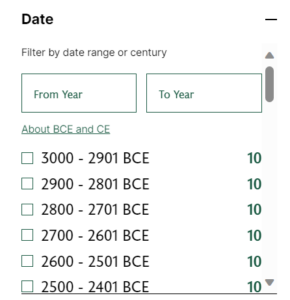
- Different filters have different options. For example, the Date filter allows you to filter by date range using the two boxes at the top, or to filter by century using the tick boxes. There is also the option for Undated objects at the bottom of the selection. If an object has been dated across a range of dates, it will show results for each century that it spans.
- Once you have applied filters, at the top search bar you can click to remove individual filters, or click the “Clear all filters” button to remove all outstanding filters on your search.

- If you have filters applied and decide to make a new search you will now see a check box called “Apply current filters” if this is selected you won’t need to reapply your previous selections.

Using our viewer
- This site uses image and manuscript ‘viewers’. They let you view, zoom and compare digital images, and are especially useful for examining archive materials like books, manuscripts and maps that can’t be handled easily.
- The site currently includes Mirador and Universal Viewer, which are web-based multi-image viewing platforms. The Mirador viewer enables you to manipulate images via the viewing controls and also to view multiple images side-by-side. You can also choose to use Universal Viewer as an alternative option by clicking into the “Full viewer”.
- If you select an object from the search results and click the “Full viewer” button on the main record image, the image area will be full screen. You will now see additional controls at the top and bottom of the image.
- Along the top bar of the viewer screen you will see the following interface.

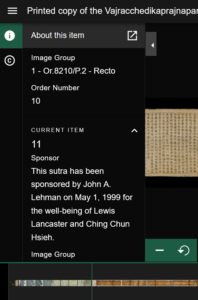
- In the top right, click on the “☰” (burger) menu button to bring up a sidebar. This sidebar has an “i” button which will show more information about the object, and a “c” button which shows copyright information for the images of the object.
- On the right-hand side of the top bar, there are more buttons.

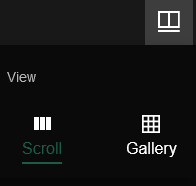
- First, the book button will give display options for the object images. Objects such as scrolls are able to be displayed “stitched together” in the viewer into one continuous image you can navigate along. However, you can also see the individual images in a gallery mode separately.
- The next button along, which has three dots as its icon, allows you to show or hide the image tools button on the right hand side.
- The purple-coloured “Universal Viewer” button will open a new tab to view the object in Universal Viewer format.
- The green-coloured “Close” button will take you back to the object detail page.
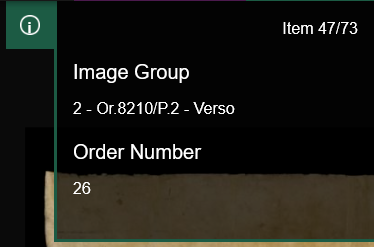
- Descending along the top right-hand side sidebar, the green “i” button will show more information about the object.
- If the image tools have been toggled to show, there will then be a button below this which brings up the image tools menu. Here, you can rotate and flip the image. You can also change the contrast, brightness and saturation of the image, as well as apply greyscale or invert the image colours. Finally, you can revert the image back to original state.

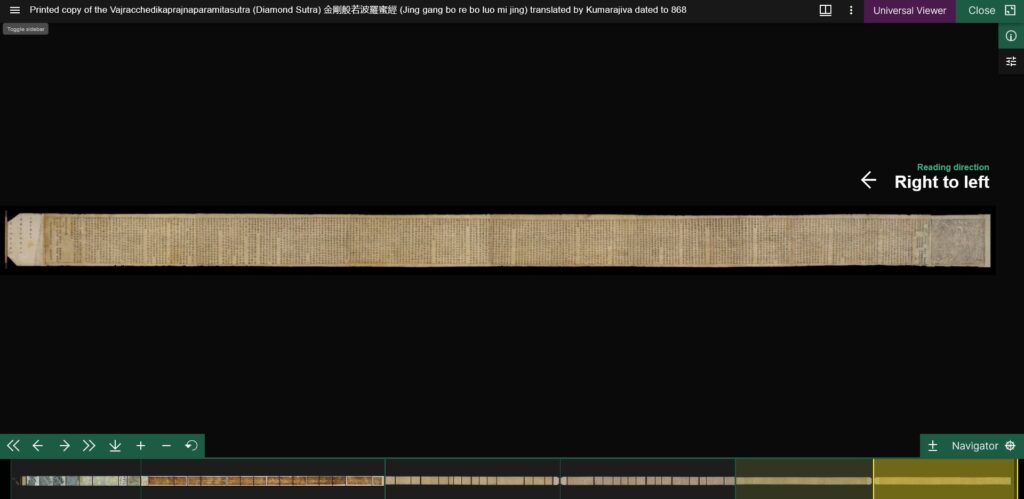
- Along the bottom of the viewer is the navigator tool.

- For very long or very tall items you will be able to navigate where you are by using the strip along the bottom. The yellow highlight shows your current view. The image sets are separated into discreet boxes.
- On the left-hand side are options to help you navigate along the image as well as to adjust the zoom. The downward-pointing arrow will also allow you to download images as well as provide copyright information.

- On the right-hand side are more navigator options. The first button will toggle the navigator viewing mode. The “Navigator ☸” button can show or minimise the entire navigator bar.

What is IIIF?
- The IDP website makes use of IIIF in order to allow you to view objects such as books and scrolls across many types of browsers and technological setups. IIIF stands for International Image Interoperability Framework, and our viewer is based on the IIIF standard. IIIF is produced in collaboration by universities and collecting institutions around the world and allows researchers of all kinds to access cultural collections online.
- IIIF is an open source protocol that allows users to easily view objects across different browsers. It also allows us to share images across institutions and to external viewers.
- Our viewer tool has had some bespoke development work in order to support items in scroll and non-standard book formats, which are common in our collection.
- More information on what IIIF is can be found here.
References
- Our database contains information from catalogues, site reports and translations covering material within the collections. This is a useful background resource for interested researchers.
- “Catalogues” are published lists of objects in collections and will often contain historical scholarship to explain objects’ significance or details.
- “Site reports” are published reports of different archaeological sites associated with the Silk Roads.
- “Translations” contain numerous translations of texts within the collection.
- Find out more about our reference material here.
Contact us
We welcome comments about the work of the IDP and this website, so please share your suggestions.
For general enquiries, please contact [email protected].
For enquiries to specific institutions for the purposes of seeing manuscripts or securing copyright and reuse permissions, please visit the institution’s page on this website or contact the institution directly.